Work Day 26th August 2017

The main task today was to give the rear of the LCP cabin its first top coat of paint. As usual, what you think will be a quick job took most of the day but the accompanying photo shows the result. The paint is still wet hence the reflections. The photo also shows the axles used to move the LCP short distances when needed. A local mod that saves having to hire a crane every time the LCP needs to be moved!

LCP Cabin Rear Wall Painted wm.jpg

Last week we left the simulator with two faults, intermittent booting and a permanent ‘Mode Change Not Allowed’ message that prevents the simulator completing its switch on. The intermittent booting fault has been resolved by replacing the SCSI ribbon cable. The second fault is not so straight forward and fault finding continues. Today was all about painting so the Mode Change fault will be pursued next week. It’s hard not having test procedures!!

Work Days 12th & 19th August 2017

We are on catch up in this blog with activities from two work days.

T86 Radar
Refurbishment of the pedestal retraction gearbox is complete; from an originally seized gearbox you can now turn the gears with your fingertips! See three stages of re-assembly.

T86 Pedestal Gearbox Re Assembly wm.jpg

This is showing the gearbox after refurbishment.

T86 Pedestal Gear Box Refurbished wm.jpg

Here is the gearbox refitted at the top of the picture.

T86 Pedestal Gear Box Refitted wm.jpg

We now have the ability to raise and lower the pedestal manually. The drive motor for the pedestal gearbox is three phase A.C. driven and we don’t have a three phase supply. The motor is in poor condition and is awaiting refurbishment which is not a priority as we now have manual control of the raising and lowering of the pedestal. On the next working day we will re-tension the pedestal drive chain ready to lower the pedestal a few inches to check its seal. The gearbox refurbishment was carried out off site, as a policy we do not waste time on-site by working on items that can be refurbished elsewhere.

Preparation of the T86 cabin for repainting continues and it is starting to look the part.

T86 Prep for Painting wm.jpg

Launch Control Post
Work has started on painting the rear wall of the LCP cabin which will receive its first top coat on the next workday. Here we see Neil in full flow with his mastery of the 4” roller to apply the etch primer.

LCP Priming Cabin Rea wm.jpg

More time was spent on the simulator fault – the simulator boots but fails to initiate the simulator. The software checks the state of several switches i.e., Missiles set to Off,  Firing Circuits  are Open and Missiles are at Reload. Switches not being in the correct position causes the ‘Mode Change not Allowed’ message on the console display screens. The fault condition is; the switches are in the correct position but the Argus 700 is not seeing that they are, or at least one of them, so gives the Mode Change message.

Mode Change Message wm.jpg

LED’s on the Digital Input cards associated with the switches indicate correctly. One possibility is that there is a problem with the Parallel/Serial PeriBus which for whatever reason is dropping a bit. Unfortunately with this type of fault there is no one item in the system that is obviously unserviceable. The software does report faults on the CHARGE display system and the GL coprocessors in the Argus but not the integrity of the complete I/O system at boot, e.g. it does not tell us which switch is in the wrong position as far as the Argus is concerned so investigation continues.


Equipment Paint Colour

We have to repaint some covers for several of the T86 radar units.The colour is as on this unit; the standard colour used on all RAF electronic/radar/radio equipment in the 60’s same colour as on the Type 80, radar office kit etc. Does anyone here know what the paint colour specification is please?
ScreenGrab012.jpg

Work Day 5th August 2017

Six of the team were present for Saturday’s working session so a lot was achieved but not until grabbing the chance for a group photo!  [Your blogger was unfortunately not there due to family commitments].

Group Photo wm.jpg

LCP
Work continues on completing the painting of the LCP cabin’s rear wall. Holes were reamed and re tapped for the roof catches and primer applied to the places were using the paint roller is not practical.
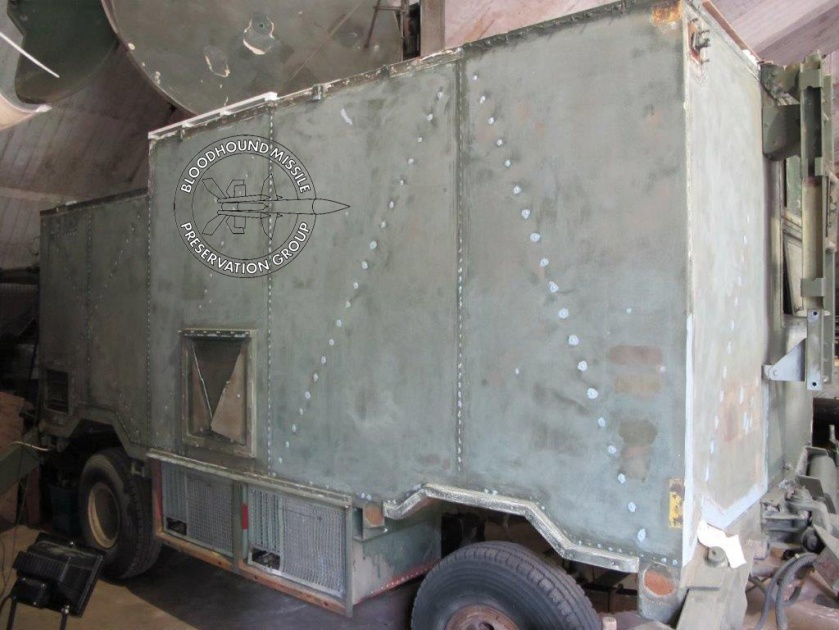
T86
The majority of work is now focused on the T86 with several tasks being undertaken.

De rusting and priming the wheel arches inside the T86 cabin. The original flooring was removed some time ago as it was completely rotten due to water ingress and fortunately the steel sections of flooring had not corroded through, namely the wheel arches. Here you can see the stripped floor and the primed wheel arches.

T86 Wheel Arches Primed wm.jpg

And here the floor is being refurbished.

T86 Floor Refurbishment wm.jpg

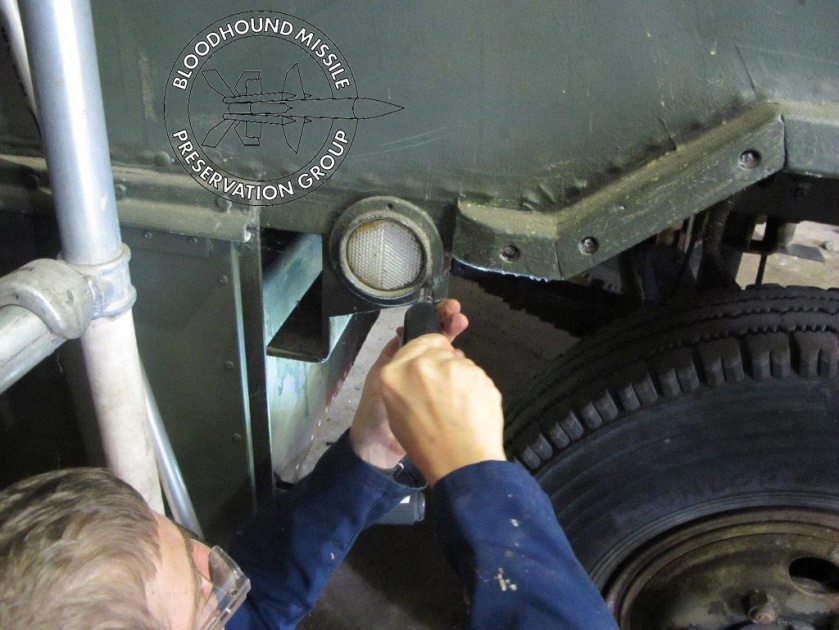
Removing as many of the external fittings to the cabin as possible, as there is usually corrosion underneath them, specifically the reflectors (seen below). Not an easy task so an impact driver was required to remove the corroded in self tappers.

T86 Impact Driver Removing Reflectors wm.jpg

Rubbing down the end wall of the cabin. Unlike the LCP the T86 cabin is in much better condition paint wise so no going back to bare metal much to everyone’s relief – especially those working on it (live action below!).

Working on the T86 wm.jpg

Simulator

The simulator was run up for its usual weekly check for us to discover it has a fault. It boots to the initial Bloodhound display screens the console lights flash (usual start up sequencing) but not all together as they should and the simulator then freezes. No time on Saturday to pursue the fault but the suspicion is a missing input to the Digital Input box so the Argus hangs waiting for it ……… we think!

Off Site – Pedestal Gear Box Refurbishment
Refurbishing the Pedestal Gear box so the pedestal can be lowered. The gearbox has been dismantled and bearings removed, the majority of which are U/S due to corrosion again caused by  water ingress. Here are the bearings being removed using a puller.

Pedestal Gearbox pulling bearings.jpg

And here are the culprits:

Pedestal Gearbox  bearings.jpg

The bearings are imperial sizes but fortunately still available so a new set has been ordered.

Off Site – Test Rig Development for I/O Cards
The test rig for checking Digital Output cards is progressing well using an Arduino to set the required addressing and data required to test the card. The digital outputs are now controllable so the next stage is to attach LED’s to the switched outputs that correspond to the LED indications on the front of the card. The test rig which is the basis for eventually testing all I/O cards for the LCP MK2 consists of:

  • Laptop for programming the Arduino and displaying waveforms/logic levels from a PicoScope (an excellent bit of kit).
  • An Arduino
  • A locally designed Serial PeriBus generator which has six lines that connect to the I/O box with a 20 way ribbon cable
  • A salvaged Digital Output box to replicate the Digital I/O box in use in the LCP. The Digital I/O box containing a serial to parallel PeriBus converter card , a parallel PeriBus Termination card and the Digital I/O card under test.

Here is the rig in its development stage of build driving a Digital I/O card.

Simulator Driving Digital I-O Card.jpg