Work Days 19th and 24th July 2021

19th July

T86 Pedestal Roof

More rubbing down before applying a primer. As the pedestal roof is steel I used a vehicle chassis primer so it’s now a nice overall grey.

Next visit I intend to cut some ply that we have liberated and cut it to size to give the roof surface some protection as we continue to work on the aerials. We have a circular saw but to cut the shape required I have now invested in a new reciprocating saw with plenty of spare blades!

I was getting a bit concerned about the damage to the hardwood rubbing strake on the T86 doorway caused by the steps. Some handy scaffolding just the right height provided a staging at the T86 door.

One job which I never get around to is sorting out all the T86 bits (mainly from the aerial assembly) that have been refurbished. To this end there are now several plastic storage boxes in the LCP for the purpose of getting them all together. Once sorted I can stop worrying about things like ‘where are the waveguide desiccators, they must be here somewhere’.
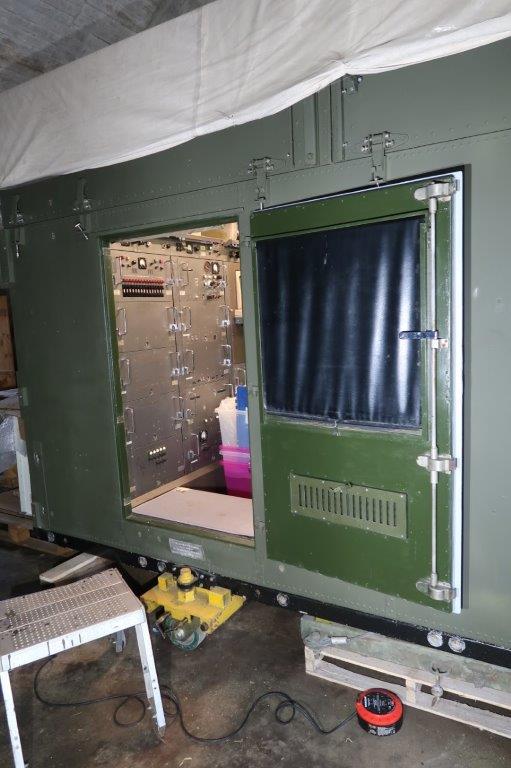
LCP Door Seal

The Engagement Controller’s escape door still has its seal attached which has now been removed. Pulling/cutting the seal away from the door (the seal is fixed to the door and not the cabin) left all the original Bostik glue in place which was removed using an abrasive flap thing on a drill. Once cleaned all remains of glue on the inside edge of the door in which the seal sat was primed with an etch primer. One photo shows a detail of the seal before removal (not in a good condition) and the second a view of the complete door with its edge primed. Note the door mat in the photo. The problem; the original ¼ round seals are no longer available so a search for a suitable alternative is under way.

This image has an empty alt attribute; its file name is lcp-escape-door-seal-2.jpg

The simulator was run up and ran for a good period. No problems in the boot sequence, no errors on the FT81 and the displays were all good. The simulator ran perfectly. Long may it continue.

24th July

It was good to be joined by Pete M and Ian for company and we got lots done. Pete and Ian did the work while I got on with collecting together previous refurbished items, mainly from the T86, which were spread around in various boxes in various places. Lots of items found which I hadn’t seen for a long while like the clips for the RF Receiver cover.

T86

Pete M has made an excellent job of repairing the hole in the steel roof below the pedestal.

The hole was caused by severe corrosion caused by water collecting on the roof which was held there by debris, mainly rotting leaves, trapped under the wooden decking slats while the T86 was in open storage. Our location ruled out welding a patch over the hole so a steel plate was riveted and sealed with a weatherproof adhesive sealant.

Ian prepared and primed the base section of the pedestal.

The lighting in the hangar could be better so Ian did mutter something about painting by torchlight! Now the base is primed we can look to replacing the Radar Absorbing Material (RAM), a rubber sheet made into a sandwich with a metal mesh. Ian finished the pedestal base in good time so he then set about painting the RAM on the pedestal frame using a rubberised roof sealing paint.

The original RAM was left in place but its surface was cracked due to the many years in the open and exposure to the elements. The first task in restoring the RAM is to skim it with weatherproof sealant and lightly rub it down before painting with rubber repair paint. Result, it looks like new.

LCP

The Harrison X150 amplifier was replaced with a spare on the basis that it’s good practice to give spares a good run, the original amplifier remains serviceable. We have a third X150 spare which will be tested next week.

Following his roof repair Pete M set up an exercise on the simulator to emulate engaging Concorde! He will refine the exercise after getting hold of accurate Concorde performance data. A good test of the exercise will be to track Concorde as a crossing target through zero doppler. The simulator remains serviceable.

Pete H

Mid-Week from ‘3rd Line’

CHARGE:
I’ve now dismantled the CHARGE test rig so I can get some space back in my office. Only one task remaining and that is our spare CHARGE controller has a defective AVX capacitor somewhere on the PCB. The controller works fine but across the +5V the resistance is 37 ohms which we can live with on a spare for now, should be around 150 ohms. I’ve tried a new technique but yet to prove it, using this temperature gun.

The gun works fine so in principle a low resistance AVX will get warm/hot so I should be able to detect the faulty capacitor. Problem is that some adjacent TTL chips all get hot under normal operating conditions so could mask a faulty capacitor. One day I’ll revisit this controller and see if I can detect the problem before unsoldering each AVX in turn until I strike lucky.

Harrison X150 Amplifier (Boost Blast):
As mentioned last Saturday I have removed the installed X150 Amp as it looked decidedly tatty (the LCP must be looking pretty good if I’m doing this sort of thing). Here is a photos collection for you to refer to.

Harrison X150 and X300 Top Cover
X150 Front Panel
X150 Internal
X300 Front Panel (original)
X300 Internal (original)
X300 Front Panel (modified)
X300 Internal (modified)

The case of the spare X150 has previously been opened but I assume it is
serviceable so will take it to Cosford on Saturday and await we will give it a run. We also have two X300 amplifiers which could be used in an emergency when fixed as they have U/S labels on them. Also, both X150 and X300 amplifiers regularly appear on eBay.

One X300 is interesting as the original innards have been stripped out and two ‘new’ ILP audio amplifier modules (one for each channel) have been fitted; it has unacceptable hum while the other has one channel U/S. I can test once I
get some test leads organised.

We do not have component-level schematic diagrams for these amplifiers yet, only the functional schematics on the lids; perhaps someone out there can locate copies for us.

Pete H.

Work Day 10th July 2021

Type 86 Radar:

As mentioned previously I’ve now actually started on filling the corrosion dimples on the cast iron work on the pedestal roof. A rub down of the filler (a chemical metal filler used for car body repairs) will proceed a repaint. The filling is being carried out in stages so will take a few weeks. Two photos here show before and after filling.

Last week I applied corrosion treatment to the waveguide desiccator securing clamps so this week they have been primed ready for a top coat. Photo below.

The waveguide desiccators have already been refurbished and are in a box ‘somewhere’ on site.

I have completed the refurbishing of the noise tube covers (photo beolw) from the RF assembly. The colour is Dark Admiralty Grey. The original paint was badly faded due to exposure to the weather when the T86 was ‘stored’ by the RAF Museum with the RF receiver cover removed!

Corrosion on transformers in the RF receiver, treated last week, have now been painted.

Here is another photo of the Aerial Assembly as restoration progresses.

Launch Control Post:

All the hex button head rack screws on the computer and I/O racks in the LCP have been replaced with slotted screws. The hex button headed screws were affected to varying degrees by corrosion. Photo below of new rack screws.

The original Harrison X150 audio amplifier is looking decidedly tatty so has been removed. A spare, which hasn’t suffered from surface carrion, will be fitted on the next work day.

Off Site:

The CHARGE Pixel Store recently repaired still had an unserviceable AVX capacitor; indicated by a low resistance of a few ohms between +5V and 0V . The only way to resolve the fault was to unsolder each AVX capacitor in turn and check its resistance. I had high hopes that this trial and error approach would find the defective capacitor without having to desolder them all, unfortunately the fault went down to the last capacitor checked!

Pete H

Work Day 1st July 2021

The first job today was to make a skirt for the pedestal to stop the grot dropping in when we work on the aerials. I’d finished the internals of the pedestal with red oxide and don’t want it to get dirty! The ‘skirt’ is shown in below.

Most of the day was on corrosion treatment, preparing the clips for the
waveguide desiccators and the pedestal roof. The plan for the pedestal roof is to use body filler to fill the masses of small dimples on the cast iron work . A repaint will then give a smooth surface rather that allow water to settle in the dimples -should it be exposed to the weather again. I also removed some fittings from the aerial system to refurbish at home. The aerials are looking good but apologies for getting me in the shot !

Here is the state of the T86 aerials when we recovered it and after the first clean.

I plan to get organised on the T86 drawer handle sand other bits that need re-chrome plating this coming week; here they all are.

As you can see there are a lot of items to be done and this work doesn’t come cheap. Donations towards it being undertaken would be most welcome, thank you.

Pete H