For those who would like to know more about the Ferranti Argus computer and its relevance to the Bloodhound Missile here is a link to a short document that provides an overview.
BMPG – Overview of The Ferranti Argus Computer and Bloodhound Missile
For those who would like to know more about the Ferranti Argus computer and its relevance to the Bloodhound Missile here is a link to a short document that provides an overview.
BMPG – Overview of The Ferranti Argus Computer and Bloodhound Missile
Thank goodness for a change in the weather but as the hangar is usually closed up apart from a Saturday it remains cold and damp. In fact, it looks like water is permeating up through the floor in places and the roof still leaks. Still, the warmer weather will dramatically improve the environment we work in, even if it takes a month or so. At least it’s pleasant when we can sit outside for tea breaks and watch the gliding club in action.
T86
Work continues on the chassis and removing the wheels from the trailer which makes preparation of the wheel arches and axles for painting a lot easier.

This shows the area around a wheel hub that has been prepared for repainting and the inner wheel of the double wheel arrangement at the rear of the cabin.

As we progress with the restoration we often don’t know what tools we need until we get there. For example the outer wheel was removed but to remove the inner wheel a ¾” square socket is needed to remove the studs securing the wheel so eBay, here we come again!
We also have a problem with one of the front wheels in that the nuts are too tight but we trying to avoid getting a contractor in if we can, cost etc; any experienced assistance would be appreciated. Even Pete’s big one didn’t cut the mustard!

Removing the wheels is safe as the cabin sits on its four jacks as in its operational state.
LCP
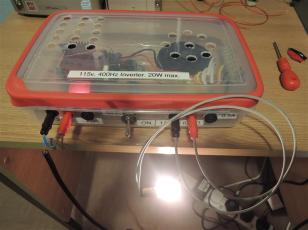
Pete M has spent many hours designing, sourcing parts and constructing a 115V 400Hz supply to drive synchros so that the radar simulator can be brought back in to use so the LCP can be used in Operational mode, the LCP currently runs in Simulator mode only. Here is Pete’s creation


Here is a short video proving the concept really does work.
And here is Pete in the LCP showing the radar simulator under test with the 400Hz supply.

Unfortunately it was discovered that the synchos in the radar simulator required more power than those used for previous testing. The goal remains to bring the radar simulator back in to use so watch this space for updates.
The simulator was run up but unfortunately the Argus failed to run with several cards indicating a failure. Card swapping failed to resolve the fault so it’s time to put the thinking caps on and get the simulator serviceable again.
We were limited with time on Saturday so whatever can be done off-line to prove the Argus cards involved (now removed) will be done.
Our major enemy is most probably condesation!
LCP
Before lunch it was more rubbing down of the internal walls of the cabin, currently the section above and to the sides of the display console. The repainting of the internal walls will refresh the look of the cabin as the existing paint is ‘aged and discoloured’, note the difference in colour between the prepared and original sections of the cabin wall below.

The holes used for the securing bolts for the Argus 200 remain as do the scratches resulting from installing the MK2 computer racks and console. The colour will remain ‘cockpit green’ as it is easy on the eye, according to the RAF in 1964. For interest, as you can see, the internal colour of the Swiss LCP’s is a light grey, this is a Swiss MK2A LCP taken two years ago. I know, it still looks brand new!

The afternoon was spent on recovering the simulator from faults, namely a U/S memory (Store) card and a U/S Pixel Store from the display system. The cards were replaced with spares, the memory card last week and the Pixel Store on Saturday. Unfortunately the display driven by the faulty Pixel Store still had a loss of Vertical Sync (the monitors are mounted 90 degrees from normal alignment) so the picture drifted across the screen with what looked like some flyback breakthrough.
![]() After around thirty minutes the display was stable and the vertical drift stopped, probably after warming up but the display cards will be re seated next Saturday as a matter of course.
After around thirty minutes the display was stable and the vertical drift stopped, probably after warming up but the display cards will be re seated next Saturday as a matter of course.
Time was also spent on using a number of Argus operating system commands to list and interrogate files, all with the aim of helping us understand what happens and in what sequence during a boot. One operating problem is that the software gets locked in a loop at boot up if errors occur with the display and co-processors. We are receiving some expert help on the software as our knowledge on the Argus 700 software is lacking – to put it mildly.
The simulator was left in a serviceable state.
T86
Further work was carried out under on the cabin chassis, it was Dave’s turn this week! It was obvious that removing the wheels would assist in this task and the accompanying images show the nuts being slackened on one wheel, leverage required!

Dave was able to remove one wheel but the others will require a lot more torque to shift them! The second image shows the wheel hub exposed after removal of vegetation and a good wire brushing.

For information, tghe tyres are Dunlop Truck and Bus brand size 10.00-15. Obviously the age of the tyres means that they are starting to perish, we don’t need new tyres as the cabin is not road worthy, nor will it be, but second hand tyres that are not perished are sought – anyone able to help please?
Absence and illness has delayed this and the next blog entry but the work goes on.
We are awaiting warmer weather so painting of the T86 can be carried out. While the LCP and T86 are under cover they are in an unheated and damp hangar which may account for the problems in running the simulator following a switch on after the cold weather.
LCP
The simulator was switched on a week ago for a test and it failed to run with a number of errors, all put down to the cold and damp. Last Saturday came a second attempt after the computer racks were warmed through with the help of a fan heater but faults remained. The first fault was in the Argus which was failing to boot the simulator and after some board swapping the memory card was found to be U/S. A spare from our Argus test rig was used and the Argus is now fully serviceable again but the Argus was not the only fault.
A second fault was one the displays driven by the proprietary Ferranti graphics system called CHARGE (Compact High-resolution Advanced Raster Graphics Equipment)![]() .
.
The image above shows the fault, lost sync and very pixelated. There are four CHARGE channels, one for each of the four displays, so some board swapping soon identified the faulty, a pixel store. Each display channel consists of three double euro cards, a controller and two pixel stores. We have repaired a pixel store in the past as the CHAGE display system is self-contained and driven by an 8086; not a single chip as one would expect today. In the meantime the faulty card will be replaced with a spare. [The fault previously was a defefctive SN7483A 4-Bit Full Binary Adder in a Pixel Store.]
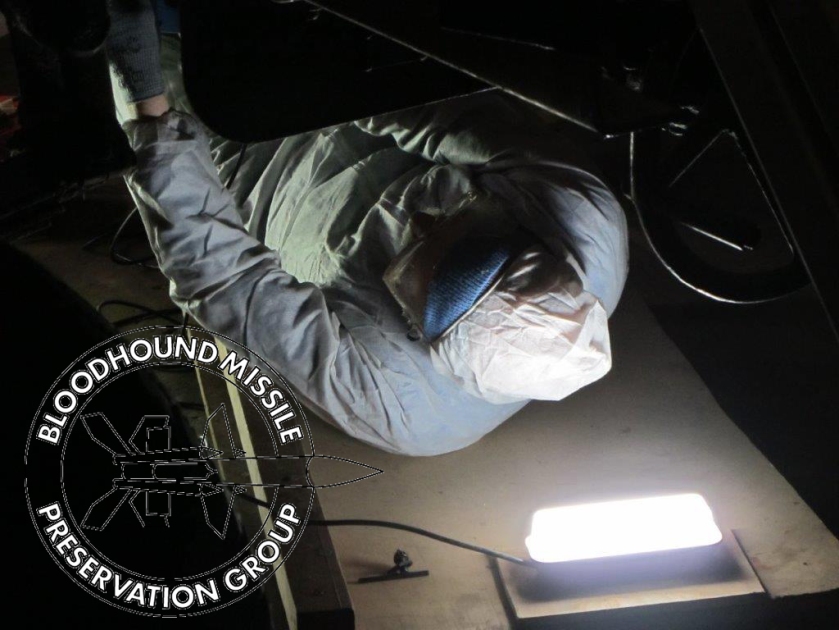
T86 Part two of prepping the radar chassis and it was the turn of Pete M and Ian who did a great job for wire brushing corrosion and removing lose paint. Working under the radar is akin to mining as can be seen in the accompanying image. Irrespective of protective clothing it is a very dirty job but all in a good cause. Thanks go to Ian and Pete M for taking it on last Saturday.
The aerial system is a collection of waveguides and awkward corners but Neil persevered with prepping for a repaint. Further work was also carried out in smoothing the paint blisters on the Tx reflector The accompanying image shows ‘work in progress’. The aerial assembly being partly retracted for easier access to the Tx reflector.

Removing flaking paint will often uncover previous coats of paint as shown in the accompanying photo. The paint colour will be NATO green for the repaint but previous colour looks to be Bronze Green or Olive Drab.

As an example of the attention to detail we are applying to our restoration work here is the Elevation Clutch on our Type 86 Radar. One good unit has evolved from from two bad ones; our own and one reclaimed from a discarded cabin wreck. Here they are as removed from the aerial assembly on top of the cabins; they had suffered considerable deterioration from ravages of the elements.

As well as restoring the paint a new pivot bracket had to be manufactured for the engagement lever and a new Terry clip sourced.

All complete and working, the engagement lever is locked down on its Terry clip.

Location of clutch on the aerial assembly:


